The Founder’s Dilemma

You have a great idea, you know how to make the numbers work, you have a plan. As a visionary entrepreneur, you also realize that technology plays a building block for your start up. You now want to launch an MVP as soon as possible. The predicament – how to get right technology team. Outsource completely? Build in-house? Build strategic partnership with technology provider?

Obviously, focus should be on getting to the market with a testable model, soon. Right technology and sound architecture are key for laying down solid foundation to enable the entire company to iterate upon. The model must be designed and built with focus on extensibility and scalability from day one. There is no point putting a model out in the market that cannot be extended quickly to account for customer feedback. Neither does it make sense to have a model that become a bottleneck as soon as you start growing customer base.

Choosing the right tech partner is one of the most important decision you will make as a founder. It is imperative that you have the right technology team from get-go for your long journey. Unless already identified, trying to build a team of technical experts from scratch is almost always fatal in achieving the goals. Like marriage, be prudent when choosing a tech partner. But how do you choose your technology partner? let’s first try to understand what to expect from technology partner

Here is a typical process your technology partner should follow:
1. Understand business
2. Understand customers
3. Listen to feedback from Sales, Marketing, Support
4. Build a set of business requirements
5. Convert business requirement to technical solution that is in line with business, solution and customer
6. Identify right technology, Interface, cadence for implementation
7. Identify and build feedback channels, enable sales, marketing and support to listen to feedback on product
8. Develop, deploy, manage the solution
9. Rinse, repeat

Some of these steps may not seem to belong to technology partner. But trust me, it is very important for technology partner to be involved at all levels. Folks running business will usually ask for solution, instead of stating problem. The technology partner must analyse the proposed solution to understand underlying problem, and then identify right solution with appropriate technology.

The process defined above is extremely simplistic. However, even this simple process is not easy to implement unless your technology partner has the right skill-set and experience. Some skills you’d want to look for in your partner are:

Technology Expertise:
This is the obvious one. Deep technical expertise and experience with wide range of technologies, handling variety of business is a must. Robust architecture, solid technical roadmap and impeccable implementation will enable long term growth.

Business acumen:
This is one of the most important quality, but also often neglected while selecting a technology partner. You are building your business from scratch. You want to make sure key scenarios are identified and implemented first. You also want to match this with related low-hanging fruits for the business and prioritize based on technical implementation. Having business aptitude is important for technology provider to provide feedback and right options to you for what to implement, how to implement and when to implement.

Variety of Experience:
During the course of running business, you will come across several situations where you need a mix of experiences in your team – experienced start-up as well as mega-corporations; experience managing small niche projects with focused teams, as well as complex large-scale projects with multi-national teams; experienced varied cross-geography cultural to add flavours to the product, experienced outsourcing, insourcing, vendor management, etc.

Leadership:
Ability to see beyond tomorrow, demonstrated thought leadership and strong multi-tasking capabilities with proven ability to lead strong teams will go a very long way in having right focused direction on product, architecture and rhythm.

Execution Driven:
Proven ability to grow and manage complex systems from scratch in a sustainable way. Remember, it is easy to build solution but much harder to support it in cost-effective manner.

Visionary :
Listens to you, your customers, anticipate needs while building roadmap. Helps you prioritize features based on implementation cost, complexity and product state and direction. Designs solutions that are simple, effective and enables go-to-market to get feedback. Helps you set course and pace for product growth.

Innovative:
Understand business, customers, help identify gaps. Define innovative technical solutions to customer’s problems; solutions that are simple, effective and sustainable.

With above skills, a competent technical partner will help you make the plans, conceptualize strong services models and value propositions, execute them, and pivot when needed. They relieve you from the technological glitches so you can focus on other core business roles such as marketing, fundraising and expanding your business. They will be your sounding board, advisors, talk you out of stupid ideas and help you sidestep from many pitfalls. This will help you avoid costly mistakes when it comes to design and development.

Don’t compromise by choosing the most economical tech partner you can find. Everyone knows this, and yet founders often compromise on this at some point during a desperate need. They often go on to regret it, and it sometimes almost kills the company. After all it is much easier to overcome cost barriers than failures due to poor execution and low quality. Haven’t you heard the saying,” When you pay peanuts, you get a Monkey!”

It takes vision, real grit and consistent Intense effort to turn a great idea into a great company. Building a great product often takes more time and energy than you have actually assumed.

Sure, you have a great idea, including a great market, but Success is really all about the team. Without the right people, lot of focus, and great execution your idea will probably never turn into a great product.

Remember, thousands of people have great ideas every day, only few of them actually become successful. The difference comes down to execution, time and again.
How to pass custom arguments to a BIRT report via GET and POST

Birt reports can be invoked using both HTTP GET as well as HTTP POST. In dynamic reports, there may be a need to pass arguments to the report. These arguments can also be passed to the report easily over http.

Via HTTP GET
Using GET is simple and straightforward. Just append the arguments as you would to any other GET request, as a query string.

http://localhost:8080/birt/frameset?__report=test.rptdesign&mystring=Hello+World

Via HTTP POST
While GET provides a simple way to invoke the reports, the obvious pitfalls of GET request stand. This includes exposing the parameters, which could potentially be used to regenerate reports if the server is not well secured. There are other reasons why you would not want to use GET, like large payload size in arguments. In such cases, the requests can easily be sent via POST as well. If security is a concern, the entire payload could be encrypted or secured in any other standard way that you would secure your POST requests.

<HTML>
<BODY>
<SCRIPT>
function post(path, params, method) {
method = method || “post”;
var form = document.createElement(“form”);
form.setAttribute(“method”, method);
form.setAttribute(“action”, path);
for(var key in params) {
if(params.hasOwnProperty(key)) {
var hiddenField = document.createElement(“input”);
hiddenField.setAttribute(“type”, “hidden”);
hiddenField.setAttribute(“name”, key);
hiddenField.setAttribute(“value”, params[key]);
form.appendChild(hiddenField);
}
}
document.body.appendChild(form);
form.submit();
}
post(‘http://localhost:8080/birt/frameset?__report=test.rptdesign’, {sample: ‘Hello World});
</SCRIPT>
</BODY>
</HTML>

How to customize BIRT Report Viewer look and feel

Enterprise software would want to maintain look and feel of all the screens in the application. This not only adds aesthetics but may also simplify usability if designed correctly. This is all the more important if a screen has a bunch of functionality that integrates with the rest of the product.

Birt is highly extensible and just like any mature product, provides ability to customize various aspects of a report. Birt comes with a plain and simple report viewer out of the box. However, there are ways to customize this page. While one can go too far depths in customizing this page, basic requirements like matching UI template is very simple to implement in Birt.

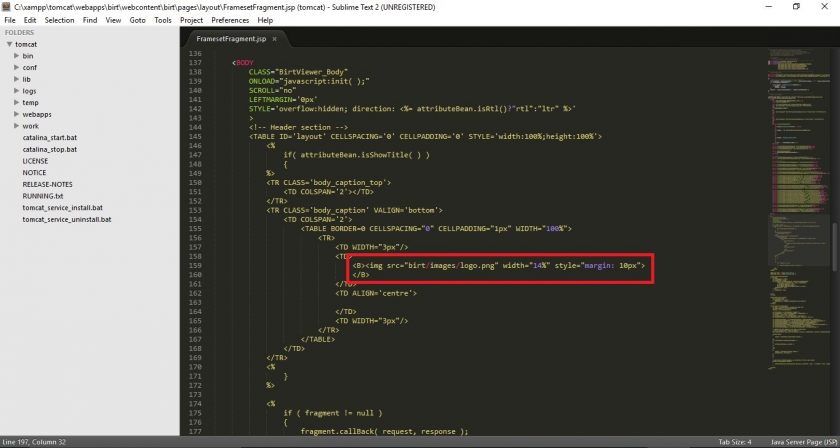
you can customize the UI of report viewer from FramesetFragment.jsp file. On a development box with just xampp installed at default location, this file can be found at:

C:\xampp\tomcat\webapps\birt\webcontent\birt\pages\layout\FramesetFragment.jsp

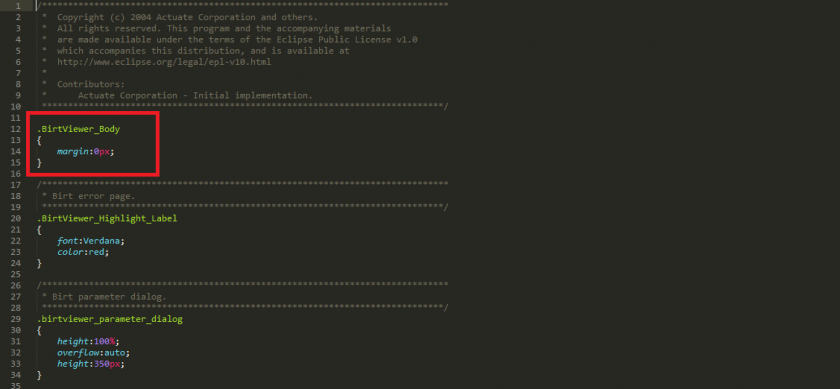
In addition, you can also customize the Style.css file located at birt\styles\style.css to match your template.

For example, if you want to add your custom logo to the page or you want to add the border to your report, you will make following change to the file:

FramesetFragment

FramesetFragment

Cloud for enterprises in tier-2 and tier-3 cities in India

Enterprises of all sizes have been reaping the benefits of cloud services for some time now. However, small and medium enterprises in tier-2 and tier-3 cities still are apprehensive of leveraging these services.

Cloud Services are ubiquitous now. It is not just an infrastructure anymore, nor does it host applications that are relevant only to large enterprises. An entire ecosystem has emerged on top of this platform. Applications with all sorts of capabilities have mushroomed, serving users at individual as well as enterprises of all sizes.

The Services offered by cloud has potential to transform enterprises, giving them a big leap in new world ruled by technology. In smaller cities and for small enterprises, these services are actually a boon as they make world class products available at affordable process in pay-as-you-go scheme. Here are some of the reasons enterprises in tier-2 and tier-3 cities should use cloud:

  1. Serving you from your region: Cloud infrastructure is available readily in India now
  1. Cost Effective: To build a modest infrastructure for an enterprise, large capital is needed to procure and deploy hardware. In addition, there are recurring costs to rent hosting providers, maintenance fee, etc. Cloud providers have processes set to procure and deploy hardware at scale and maintain the infrastructure. The infrastructure itself is shared by multiple clients and cost distributed to clients only based on their usage. Naturally, small and medium enterprises have a very minute footprint in this infrastructure and their corresponding cost of usage is also way less than what is needed for dedicated setup.
  1. High Quality: Cloud Infrastructure Providers buy millions of dollars’ worth of equipment. There are only few vendors in the world who can fulfill such massive orders. Obviously, these are among the best hardware vendors in the world.

    Similarly, to take care of this infrastructure, they hire world’s some of the most talented software and system engineers. Be assured of service quality – it is guaranteed going to be much better service than what your local small vendor can provide.

  1. Fulfill Regulatory Requirements: with the advent of e-governance, government is bringing in regulations to require vendors to store data within the national boundaries. Cloud datacentres are now easily available within the country and you can cherry-pick where your resources are going to be provisioned, making it easy to adhere to Government Policies. This is very important, if you work in government sector.
  1. Availability: Your data is available anywhere and anytime. Outages because of power unavailability is a thing of past.
  1. Scalability: Cloud computing allows you to easily scale your infrastructure the way you want it – scale up, scale out, or you let cloud scale the infrastructure for your application based on usage. Remove barriers and let the business fly!
  1. Disaster Recovery: Your apps and data are usually stored on multiple machines in multiple datacentres that are in different geographical region. Such geo-redundant infrastructure is a must for Business Continuity and Disaster Recovery.
  1. New Business Opportunities: Advanced features like archiving, Data Protection, ease of business for customers definitely give a competitive advantage. In fact, it may as well open new business opportunities or help manoeuvre your business into newer territories.
  1. Teamwork: Easy access will always keep your team connected without delay in any work, which results in more connected and increased teamwork. 

Like any other technologies, cloud computing too has its drawbacks. The biggest being change in processes and way of thinking, especially for business heads. However, when compared with potential gains, these are very minor and short-lived. Moving to cloud is inevitable for you and your business. You may be surprised to find how you are already using cloud services unknowingly. Adopt it wholeheartedly for a better future for your enterprise.

Beginner’s Guide for BIRT and PHP

Install Tomcat

  1. Download XAMPP from here: https://www.apachefriends.org/download.html
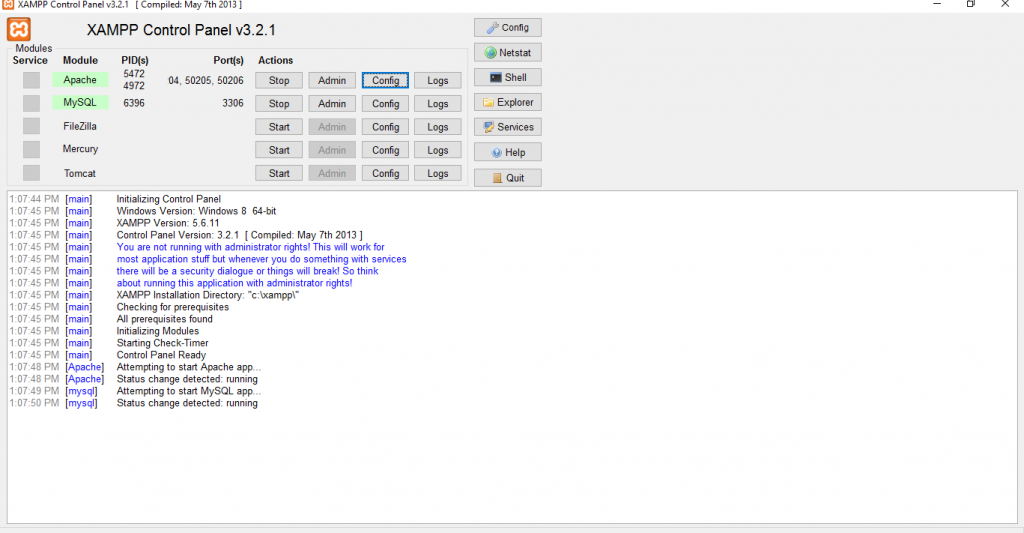
  2. Start XAMPP and go to XAMPP Control Panel. XAMPP Control Panel
  3. Start Tomcat service.
  4. Test Tomcat: http://localhost:8080/ If you get a webpage, then you have tomcat ready for Birt

Install BIRT Design Tool

Birt Designer is a visual report development tool with task-specific editors, builders and wizards that enable you to create data visualizations that can be integrated into web applications.

  1. Download the BIRT Report Design Tool, from here:
    http://download.eclipse.org/birt/downloads/BIRT Report Design Tool

Install BIRT Report Viewer

The BIRT Runtime contains three different packages: The Report Engine, the exploded Sample Viewer WAR, and the Sample Viewer WAR. Your choice of package will depend on your deployment scenario. You can find more details here: http://www.eclipse.org/birt/documentation/integrating/viewer-setup.php

  1. Download the BIRT Report Viewer: http://download.eclipse.org/birt/downloads/#runtimeBIRT Report Viewer
  2. Deploy the BIRT Viewer application. Follow these steps:
    1. Download the zip file with the BIRT report engine runtime. The file is named birt-runtime-version#.zip
    2. Unzip the file in a staging area
    3. Look under the birt-runtime- directory and locate the “Web Viewer Example” director.
      Copy the “Web Viewer” Example directory to the <XAMPP ROOT>\tomcat\webapps directory of your Tomcat installation. For ease of reference, rename the directory “Web Viewer” to “birt-viewer“.
    4. Restart Tomcat.
    5. Review the Tomcat manager application to check that the viewer is deployed:
      http://localhost:8080/manager/html
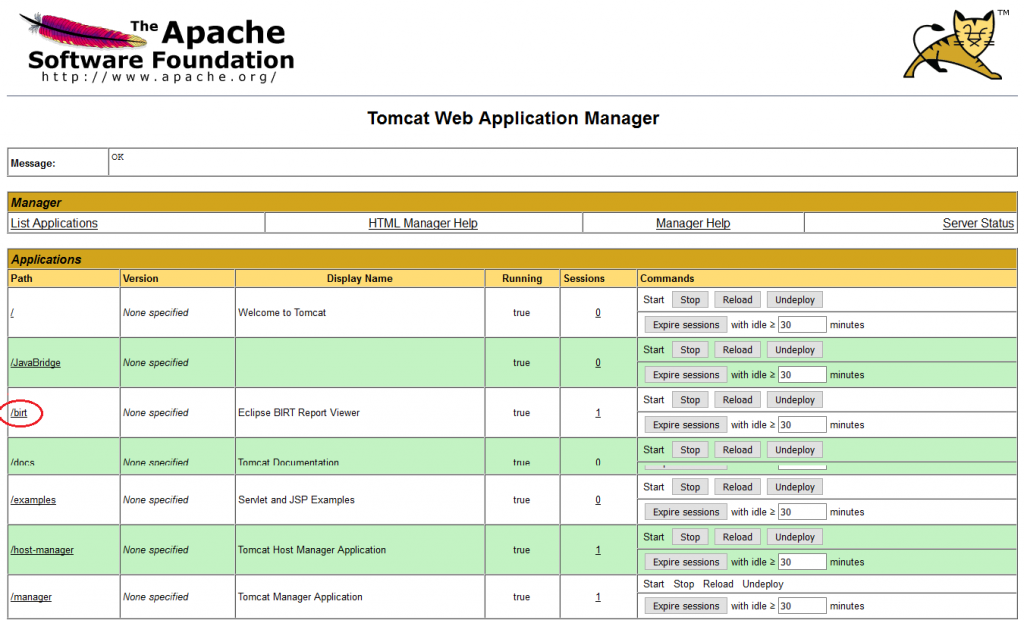
      Tomcat web application manager
    6. Verify that birt-viewer is listed as an application, then click on the birt-viewer
    7. A page confirming that the BIRT viewer has been installed should be displayed. Click on the link labeled “View Example” to confirm that your installation is working properly.
  3. A note about client configuration: The BIRT Viewer requires that cookies be enabled on your browser. Follow steps below on Firefox to enable cookies:
    1. click the menu buttonmenu-icon and choose Options.Preferences.
    2. Go to Privacy Panel
    3. Set Firefox will: to Use custom settings for history.
    4. Check mark Accept cookies from sites to enable cookies, and uncheck to disable.

Note: Cookies are enabled by default in Firefox

Install JDBC Drivers

  1. You may download drivers from mysql site here:
    https://dev.mysql.com/downloads/connector/j/
  2. Add the jar files for your JDBC drivers to the Viewer. Copy the driver from the following directory:
    Path for Windows Jar File: <XAMPP-ROOT>\tomcat\webapps\birt-viewer\WEB-INF\lib
    Jar file path
  3. BIRT JDBC Driver Location NoteIf you are installing BIRT 2 series the driver needs to be copied to birt-viwer\ReportEngine\plugins\org.eclipse.birt.report.data.oda.jdbc_yourVersion\drivers If you are installing BIRT 3.7 or higher, the jdbc driver should be placed in the WebViewer’s classpath (eg WEB-INF/lib).
  4. If you choose to put the Viewer into some other location, you’ll need to use a context entry within the server.xml file to indicate the deployment location. See Tomcat documentation for details.

Verify BIRT Installation

  1. Check if BIRT is integrated with Tomcat or not. You can check using the following steps
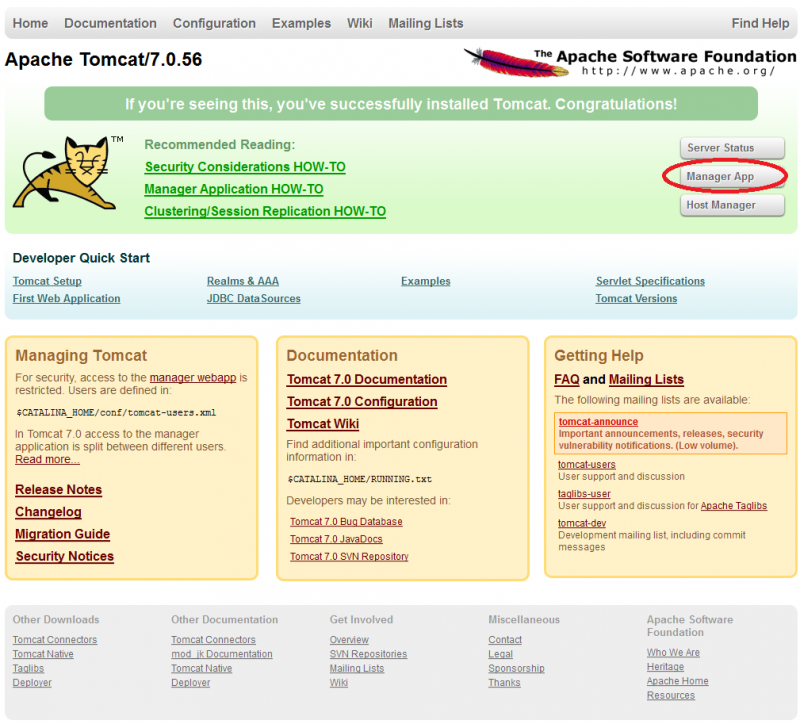
      1. Open tomcat and create the User (i.e) go on the Manager App.
        Apache Tomcat
      2. Click on “Manager App” you will get a window prompt for login. If you got a username and password proceed with the login or create username and password, go to next step.
        Manager App Login
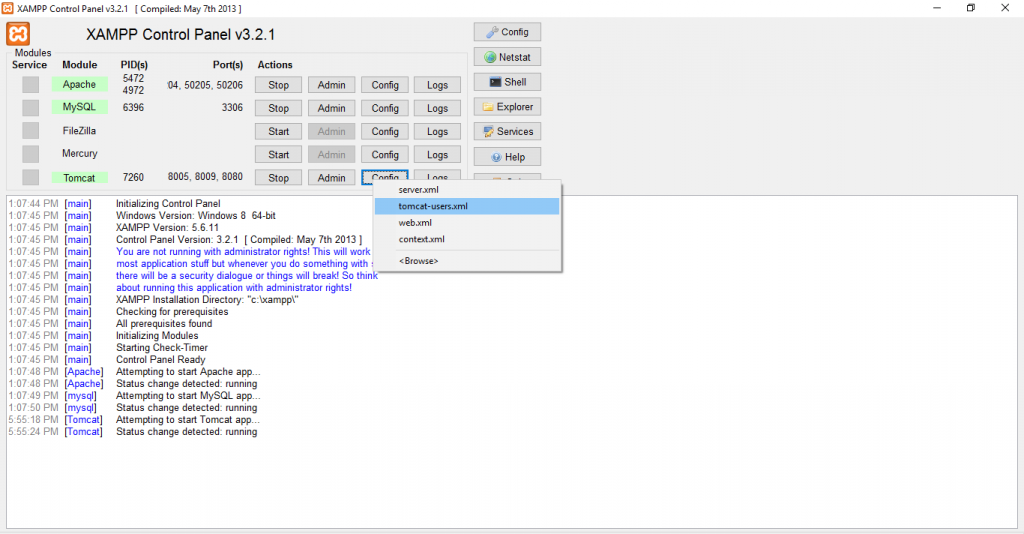
      3. Open XAMPP control panel, go to
        Tomcat->Config->tomcat-user.xml.
        XAMPP Panel
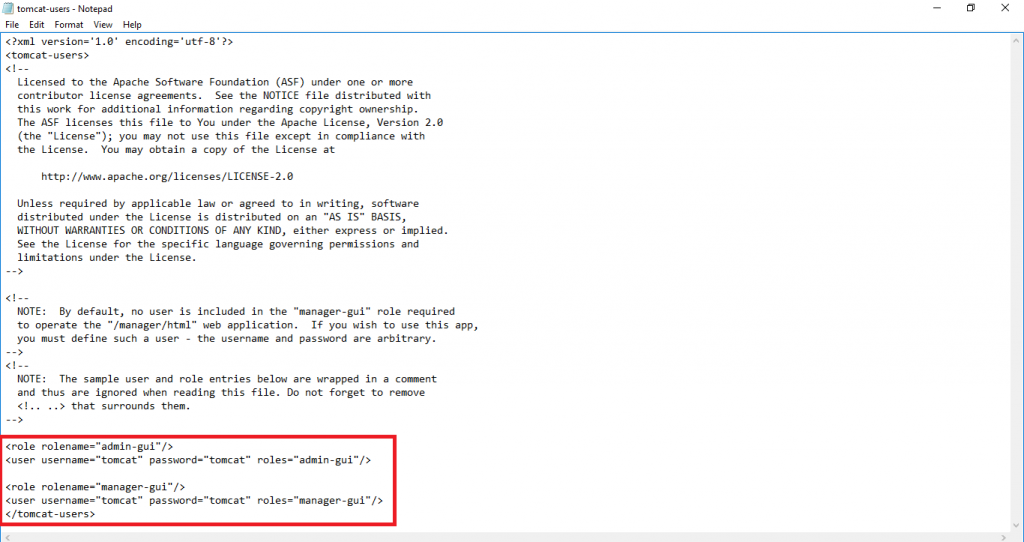
      4. It will open the tomcat-user.xml file, where you can create username and password for admin & manager.
        tomcat-user.xml file
      5. After creating the username and password for both the users, try login with Manager App credentials.
        Manager App Login
      6. Successful Login. You will come across the tomcat web application manager window. Follow the next step go to BIRT.
        Tomcat Web Application Manager
      7. After you click on BIRT, you will get a message BIRT viewer has been installed. Here’s where you are confirmed BIRT is successfully integrated with Tomcat.
        BIRT Viewer
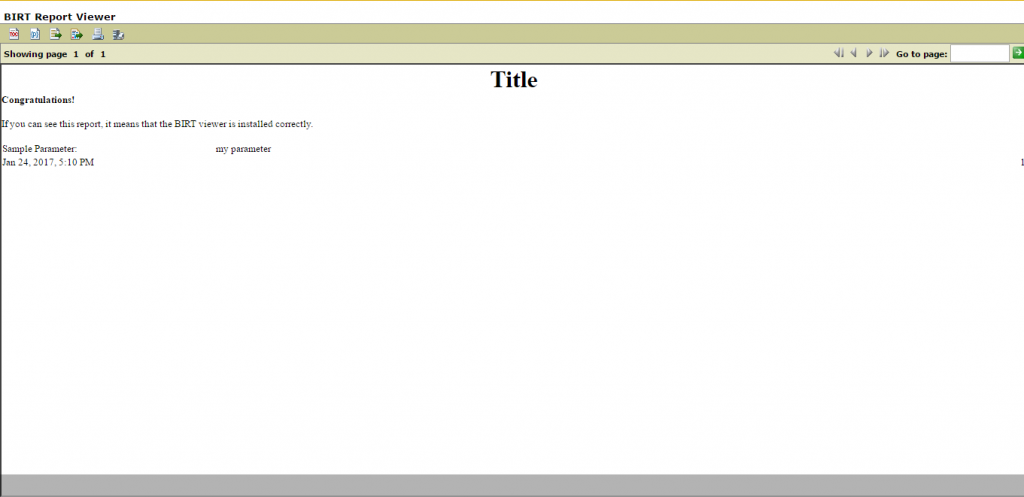
      8. Check for the Example (i.e) displaying a report. Below is the sample view of a report.
        BIRT Viewer Displaying Report

Finish

Here’s you BIRT is ready to integrated and ready to use with any project. You can display multiple reports with BIRT, as it is user-friendly and comes with easy deployment process. It Supports different type of charts which can make your reports more appealing, attractive and more presentable.

How to debug PHP Applications

Debugging PHP based applications running on a server is a little tricky. Sophisticated IDEs for PHP are available to buy in the market. If you are frugal like I am, then your options are limited. Open Source community provides pieces to enable debugging web based PHP applications. However, stitching up these pieces together to set up an end to end environment is usually a challenge for junior developers.

Junior developers usually are not very well versed in setting up server components like apache and PHP. They consider the server as a black box, even boiling down to a single server software in the form of WAMP/XAMPP server. Setting up PHP debugger involves installing several pieces of software and configuring PHP and other environments, further making it non-trivial for a large number of developers.

This guide walks you through setting up each piece to enable debugging web applications built on PHP. Note that there are several ways to achieve what is done here. The intent here is to simplify set-up to get going with quick steps. The steps should work for development machines, where entire stack may be on just one machine. It should also work if individual layers of stack are spread over different machines, so long as they are all in the same network. Remote debugging for environments that span network boundaries is also possible, however, we’ll leave it for some other time.

Installation

In this guide, we will use following software to set up end to end environment to debug PHP applications

  1. Microsoft Visual Studio Code – This is a very light weight editor from Microsoft. Although it is fairly new, I am impressed at the capabilities it has already amassed. Best part – it is available for different platforms.

Download and install VS Code from here: https://code.visualstudio.com

VS Code is open source and can be found on github here: https://github.com/Microsoft/vscode

  1. PHP debug extension for VS Code – VS Code comes with a plethora of extensions that add capabilities to it. We will use the PHP-Debug extension by Felix Becker.

Open VS Code, press CTRL+P and then type: ext install php-debug

PHP-Debug extension is open source and can be found on github here:https://github.com/felixfbecker/vscode-php-debug

  1. XDebug – This is the core of the debugger. It actually is a PHP extension that implements the DBGp protocol.

Download extension customized for your machine, from here:https://xdebug.org/wizard.php

The link also gives clear instructions about how to install the extension.

XDebug is open source and code is available here : https://github.com/xdebug/xdebug

  1. Chrome XDebug Helper – this is a Chrome extension that enables debugger remotely, based on query parameters. It is also possible to always keep the debugger on, using PHP.ini config options.

Follow installation steps here: https://github.com/mac-cain13/xdebug-helper-for-chrome

End to End

XDebug site has very good documentation on how the final end to end setup will look like. Check it out here: https://xdebug.org/docs/remote, particularly the gifs showing steps and flow.

In short, the remote debugging works on a client server model. Your IDE (VSCode here) is the server. by default, it will listen on port 9000. XDebug PHP extension acts as a client. The extension can be invoked based on a variety of configuration options. Once invoked, it will connect to the server and relay all the debug information. In VS Code, you may also step through the code line by line and the client and server will follow DGBp protocol to enable remote debugging.

Configuration

  1. Configuring XDebug – Xdebug comes with several configuration options to suit your debugging needs. you can review the options at XDebug website. They need to be configured in your php.ini file. Of particular interest for remote debugging are following options:

xdebug.default_enable=1
Xdebug.remote_enable=1
Xdebug.remote_host=localhost (or the IP of the machine where VSCode is running)
Xdebug.remote_port=9000
xdebug.remote_autostart=1

remote_autostart will debug every http request. There are other ways to control on which requests the debugger will be invoked. This is by far the easiest to begin with. If you want to selectively debug requests, you can use the XDebug Helper Chrome extension (described below)

  1. In VSCode, go to “File”à”Preferences”à”User Settings”. On the right-hand side of split window, add path for php.exe file:

“php.validate.executablePath”: “c:\\xampp\\php\\php.exe”,

  1. Open VS Code, click on the debug button. A blue button with title “Add Configuration” shows up on the bottom right hand side. Click on it and VSCode will add default configuration for XDebug. Accept it.

Showtime

  1. Open your code in VSCode and set breakpoints
  2. Fire up chrome. You should see ‘Xdebug Helper’ extension icon. Click on it and select Debug. This step is necessary only if you have set remote_autostart=0 in php.ini file.
  3. fire your query and voila! You should see the code paused in your VS Code breakpoint.

Happy Debugging!!